You want to start your seeds indoors, but you’re not sure how to get started. Follow these indoor seed starting tips and you’ll be well on your way to a successful garden! You can use our indoor seed starting tips, to make sure that everything goes smoothly when it comes time for transplanting outdoors!
Did you know that you should never use soil from your garden to start your seeds? Or that the best way to handle your seedlings is by the leaves? Read on to find out why!
Why Sow Seeds Indoors?
Here’s one reason. Warm-season vegetables, such as tomato plants and peppers, can’t be planted too early in the spring because the soil is too chilly and in cooler regions there just aren’t enough days in the season.
Furthermore, in areas where the temperature is warmer, seed starting indoors allows you to get in an additional round of crops (particularly cool-weather crops) before summer heat inhibits growth.
How Do You Start Seeds Indoors?
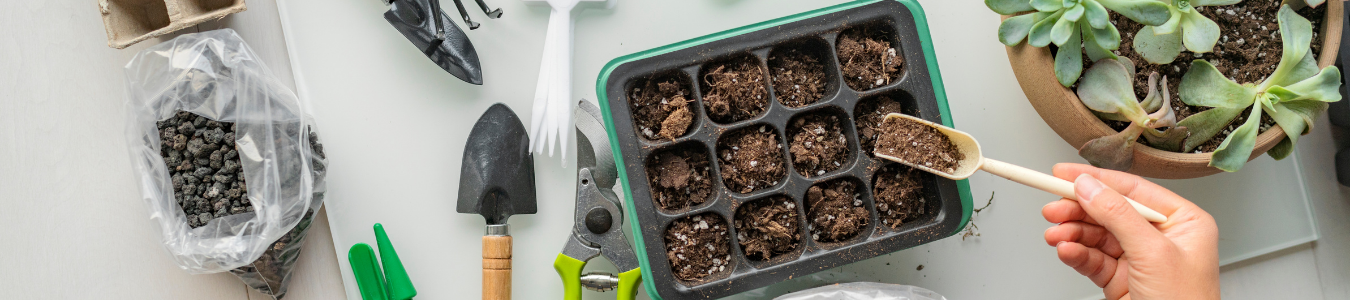
You can start them in single trays, pots, or plug trays. To begin your seed starting adventure, all you need is something to grow in, sufficient light, and some seed starting mix. Make sure it’s a high-quality potting mix. Use an all-purpose or multiuse potting mix for big seeds. Seed starting mixes are ideal for tiny delicate seeds.
It is simple to sow in a pot or a plug tray. Fill your pot or tray with the seed-starting mix, then make small indentations in the mix with your finger. Drop one to three seeds into each indentation, and cover them with a light layer of mix. Gently water the seeds and place them in a warm location
Sowing In A Pot Or A Single Tray
Fill it to the brim with potting mix and then press it down firmly. It’s difficult to over-firm, and seedlings like lots of potting mix to keep them alive. Small seeds can simply be scattered across the surface tamped down and covered with mix.
If You Are Using Plug Trays
Fill the plug trays to the top and press down to settle. Top up with a little more of the mixture, then brush off any excess. Sow three to five seeds per plug and thin to the healthiest seedling when ready.

Pots, Trays, Or Seed Pods
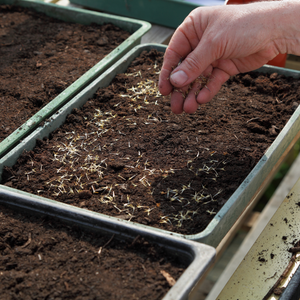
Plant your seeds at the depth indicated on the package. Many seeds may simply be pressed into the mix with your fingers or a pencil eraser.
Cover the seeds with potting mix once they’ve been planted; this will ensure that they are at the correct depth (as specified on the seed package).
Water the containers or trays completely. You want to moisten the mix, so the seeds wake up! Don’t worry if you overwater it now; any extra water will just seep out of the bottom.
Label them, label them, label them! You might think you’ll remember, but it’s way too easy to get confused. Trust me.
Replanting Your Seedlings
If you grew seedlings in seed trays or a container, you’ll need to transplant them into their own containers once they’ve germinated. If you do this once they have their first set of true (or adult) leaves Then your seedlings will be a little sturdier and easier to move.
Don’t put off re-planting your seedlings for too long; overcrowding them could lead to a variety of problems, including leggy seedlings and disease.
In case you’re interested, it’s fine to move seedlings as soon as the seedlings are big enough to handle. Sometimes it’s a lot easier to separate the seedlings when they’re small.
To Replant Seedlings
- Fill new pots with some potting mix, an all-purpose or multipurpose potting mix is just fine. Then make the holes for your seedlings
- Remove the seedlings from their original containers. Once you’ve separated them, put them in their waiting holes.
- If seedlings are leggy, go ahead and plant them a bit deeper to assist support and help them get back on track.
- Gently press the soil around your seedling’s roots (firm your seedlings in). Then water them with care.
- As your young plant’s mature check often to make sure they have enough water.
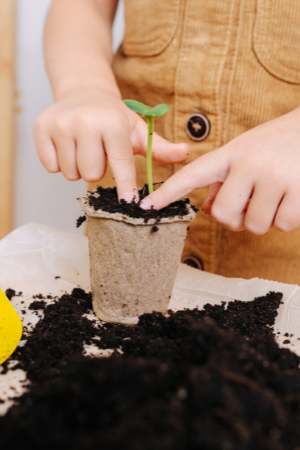
THIS IS IMPORTANT
Handle seedlings very gently. The stems are very fragile and if you damage or crush them your seedlings are toast! Also, try to avoid damaging the roots. This is why it’s sometimes better to use smaller seedlings: they grow quickly and have fewer roots, so there is less chance of damaging them.
7 Tips For Starting Seeds Indoors
When it comes to seed starting, the rules are simple: give your plants the right amount of light, water, warmth, and a decent planting mix, and they will grow. But there are a few tips that can help make the process easier and give your plants a better chance for success.
1: Start With Fresh Seed.
When growing plants from seed, it is important to use fresh, high-quality seed. The fresher the seeds, the better the chance that they will germinate and produce healthy seedlings. Old seed may not germinate well or at all
One way to ensure fresh seed stock is to always check the dates on the seed packets. Another way is to save your own seeds. This way, you can be sure that the seeds are fresh and have not been sitting on a shelf for years
2: Keep The Soil Moist
Good soil moisture is important for healthy seed germination. Keep the soil moist, but not too wet (wet soil can harbor soil borne fungi) until the seeds germinate. After they have germinated, continue to water them regularly, but be careful not to give them too much water. Overwatering can drown the seeds and prevent them from germinating.
Which is better, watering from the top or the bottom?
Bottom watering is usually a good idea because it keeps the soil surface drier, reducing disease concerns. Top misting helps to keep the surface of small seeds or surface-sown seeds wet for better germination. Self-watering seed-starting systems rely on a wicking fabric to deliver water from the bottom, ensuring a constant supply of just the right amount of water to the soil.
3: Young Seedlings Need Light
When it comes to seed starting light is one of the essential ingredients. All plants need light to turn water and oxygen into food. If they don’t have enough light, they can’t make carbohydrates and they will die.
Window sill or Grow lights?
Although it is possible to grow seedlings on a sunny windowsill, you’ll get much better results if you grow them under lights. That’s because the sunlight in early spring isn’t as bright as the summer sun, and the days are shorter, too. Seedlings growing on a windowsill will grow toward the light, resulting in long, weak stems.
If you are using grow lights, position them about two to four inches above the tops of your containers or trays. Keep the light on for 16 to 18 hours per day.
4: Keep Them Warm.
When starting seeds, it is important to keep the temperature in the ideal range for germination. Most seeds will germinate in temperatures between 40 and 70 degrees Fahrenheit. Cold soil or temperatures below 40 Degrees make it harder to trigger germination.
Do I need a heat mat for starting seeds?
A seed heat mat does make it easier to ensure that the soil stays in the proper temperature range, but it’s not necessary. Most of the time just a warm tucked-away spot is fine. Another option is on top of any appliance that gives off a little warmth (frig/freezer). You can also cover them with some plastic wrap, or a grow dome. just make sure it’s ventilated.
5: Seedlings Need Food.
Adding more nutrients and fertilizer to your seedlings will help them grow bigger and stronger. When they are transplanted to the garden, they will be more likely to survive and produce a greater harvest over the season.
Feed young seedlings with a mild dose of a balanced fertilizer, or one that includes more Nitrogen and Potassium. Liquid fertilizers are preferable to granular ones at this age.
When should I start fertilizing my seedlings
When seedlings are an inch or two tall or have their second set of real leaves, that’s when you can start to fertilize.
The first set of leaf-like structures aren’t leaves at all but are the seedling’s food storage structures. The ones that grow after that, the ones that resemble the mature plant’s leaves. those are the true leaves.
6: Plant At The Correct Depth
When you plant seeds, it is important to plant them at the correct depth. On average seeds should be planted at a depth of 2-3 times their diameter. Larger seeds can be planted deeper, while tiny seeds should be planted closer to the surface. Be sure to read the seed packet for specific instructions.
7: Use The Best Planting Medium
Plant in nutrient-dense soil that drains well and retains moisture, and to keep the soil moist but not wet. You can buy a commercial seed starter mix, or you can make your own mix by combining one part of potting soil with one part perlite or vermiculite. Also,
Can I use garden soil as a seed starter
Garden soil doesn’t drain well, especially when used in small seed-starting trays. Garden soil can also harbor disease organisms that can damage or kill young seedlings. You’ll get the best results by starting seeds in a mix formulated for starting seeds indoors.
Seed Starting Supplies
You can find all of these supplies at your hardware or local garden center. You may also want to order your seeds from a seed catalog, which you can request by visiting the website for your favorite seed company.
Containers or trays to hold your soil
You will need some type of container or tray to hold your soil. You can use commercially-available flats or trays, or you can make your own out of cardboard or newspaper.
Seed starting mix
Buy a good quality seed starting mix. Or to make your own soil mix, combine one part potting soil with one part perlite or vermiculite. This mix is light and nutrient-rich and will help your seedlings thrive.
Watering can and misting bottle
A water can or misting bottle is also helpful for starting seeds. It allows you to keep your seeds moist, but not too wet.
Seed labels
You will need to label which plants you are starting and when you planted them. Seeds often take several weeks to germinate, so it is important to be able to record this information so that you know when your plants will be ready to transplant.
Fertilizer
Organic or not it’s your choice. I prefer organic. whichever you choose, It’s better to use an all-purpose, water-soluble fertilizer. It should have an equal balance of nitrogen, potassium, and phosphorus, as well as organic components such as humic acid. You can also use a seaweed/fish emulsion.
Seed heating mats (optional)
If you live in a colder climate, you may want to use a seedling heat mat to help your seedlings germinate. A seedling heat mat is a plastic pad that you place under your containers or trays of soil. It will keep the soil warm, which will help your seeds germinate.
Grow lights
Grow lights come in all shapes and sizes. You can buy special seedling lights that fit on a windowsill, or you can use a regular full-spectrum fluorescent light fixture. The important thing is to make sure the seedlings get at least 16 hours of light a day.
The Journey Is Over
The time has come. you have followed the seed starting path to its end. You are no longer growing seeds indoors. It’s time to transplant seedlings outdoors. Your vegetable seeds are now young plants and it’s time to set them free.
Starting seeds indoors can be a fun and rewarding experience, and it is a great way to save money and get the best plants.
I hope these seed tips will help you get your seeds started indoors with success! With a good quality seed starter mix, water-soluble fertilizer, grow lights and heat mats if needed, you should be well on your way to a successful garden. Thanks for reading!
If you you enjoyed this post please share